Showing posts with label Blogger Tricks. Show all posts

Highlight Author's Comment in Blogger


This is a nice way to make your ( author's ) Comment different from all other comment that your readers left. Its is a very Interesting and useful Blogger tip..


1. Login to blogger, then choose "Layout --> Edit HTML". Don't forget to backup your template first.
2. Check the "Expand Widget Templates" box.
3. Copy this script and put it before ]]></b:skin> or copy to your CSS area.
.comment-body-author {
background: #E6E6E6; /* Background color*/
color: #000; /* Text color*/
border-top: 1px dotted #223344;border-bottom: 1px dotted #223344;border-left: 1px dotted #223344;border-right: 1px dotted #223344;
margin:0;
padding:0 0 0 20px; /* Posotion*/
}

4. Then find this code:

<dl id='comments-block'>
<b:loop values='data:post.comments' var='comment'>
<dt class='comment-author' expr:id='"comment-" + data:comment.id'>
<a expr:name='"comment-" + data:comment.id'/>
<b:if cond='data:comment.authorUrl'>
<a expr:href='data:comment.authorUrl' rel='nofollow'><data:comment.author/></a>
<b:else/>
<data:comment.author/>
</b:if>
said...
</dt>

<b:if cond='data:comment.author == data:post.author'>
<dd class='comment-body-author'>
<p><data:comment.body/></p>
</dd>
<b:else/>


<dd class='comment-body'>
<b:if cond='data:comment.isDeleted'>
<span class='deleted-comment'><data:comment.body/></span>
<b:else/>
<p><data:comment.body/></p>
</b:if>
</dd>

</b:if>

<dd class='comment-footer'>
<span class='comment-timestamp'>
<a expr:href='"#comment-" + data:comment.id' title='comment permalink'>
<data:comment.timestamp/>
</a>
<b:include data='comment' name='commentDeleteIcon'/>
</span>
</dd>
</b:loop>
</dl>


5. The orange color text is the code that you have to add to your script. The position must be right.
6. And then save your template


More about blogger tips

3 Reasons of not making profit from google adsense:


  1. Low Traffic:The more traffic you have the more your blog or website will be profitable and more are the chances to get good profit, they are simply directly proportional......
    If you are not having good traffic, less percentage of people will click your ads and you would not be able to get good income from Google Adsense...
    So in the primary goals add this point too, " increasing traffic.."
    some tips i provide will help you increase your traffic
    Add a 'share on facebook' link to blog
    Submitting Url to major search engines
    Submit Blog to Blog Directories
    Blog Walking
    Getting Free traffic from Yahoo Answers
    Link Exchange
    Optimize blog title for better SEO
  2. Ads placed poorly:
    Ads not placed in a nice area can also hurt your earnings....
    below is a graph here the dark colours are the best position for your ad placement
    Generally Large Rectangle is the best performing ad so far....
    try to blend the colours with your blog so that readers click on them by considering them as content of your blog....


  3. The Topic/Theme or content of your blog isn't conducing to make you earn money on adsense
    This is a main point please try to write about a profitable topic that make you earn money. Simply if you want to add Adsense to your personal blog then for sure you would not be able to earn money with that....
    Try to find a profitable Keyword/ a profitable topic and write about it...

    here is the keyword tool see and find good keywords for your blog and write about them on your blog... Keyword Tool

If you liked this post please leave a comment or subscribe to this blog via RSS or Email


Adsense ads in Blogger post body


Using Blogger Feature:

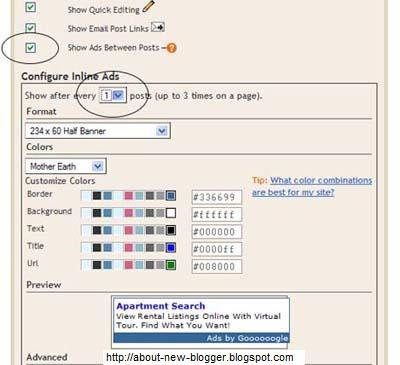
You can use Blogger's own feature of putting ads in between posts...
Go to Layout -> Page Elements... you would see "Blog posts" click the edit link at the bottom right corner.


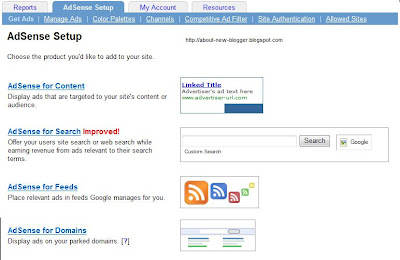
You would need a Google Adsense . You will be assigned a publisher identity number which shall appear in all your adsense codes.....
Tick the "Show Ads Between Posts" .You can select whether to show ads after every post or after several posts.
Save and refresh your blog to see the ads...

More ad Locations:


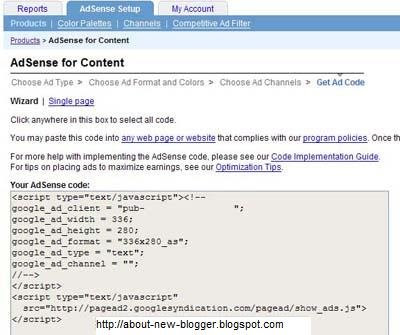
Go to Adsense For Content
Make Ad of your choice
You would get a Adsense Code


Changing the Adsense Code:

You Should replace some character

< with &lt;
> with &gt;
" with &quot;


Your Adsense code should appear like this...

&lt;script type=&quot;text/javascript&quot;&gt;&lt;!--
google_ad_client = &quot;pub-0000000000000000&quot;;
google_ad_width = 336;
google_ad_height = 280;
google_ad_format = &quot;336x280_as&amp;amp;quot;;
google_ad_type = &quot;text&quot;;
google_ad_channel = &quot;&quot;;
google_color_border = &quot;FFFFFF&quot;;
google_color_bg = &quot;FFFFFF&quot;;
google_color_link = &quot;000000&quot;;
google_color_text = &quot;000000&quot;;
google_color_url = &quot;000000&quot;;
//--&gt;&lt;/script&gt;
&lt;script type=&quot;text/javascript&quot;
src=&quot;http://pagead2.googlesyndication.com/pagead/show_ads.js&quot;&gt;
&lt;/script&gt;


Insert Code Into Template:

Go to Blogger Account and Layout -> Edit HTML
"Expand Widget Templates"

First Download your template before making any changes...

Now search for "post.body" you should see these lines
<div class='post-body'>
<p><data:post.body/></p>
<div style='clear: both;'/> <!-- clear for photos floats -->
</div>


If you want the ads to appear between your post title and post body, add the following code above the orange lines and if you want you your adsense code immediately after every individual post, add the following post below the orange lines.
The code to add is


 <div style='float:left; margin-left:30px'>
AdSense Code
</div>
Keep blogging!!!
if you like this post then please leave a comment or subscribe via RSS or Email.

To Hide The Blogger Nav Bar

1- Log in to blogger

2- On your Dashboard, select Layout. This will take you to the Template tab. Click Edit HTML. Under the Edit Template section you will see you blog's HTML.

3- paste this CSS definition

#navbar-iframe {
display: none !important;
}


Just Below this


-----------------------------------------------
Blogger Template Style
Name: Rounders
Designer: Douglas Bowman
URL: http://www.stopdesign.com/
Date: 27 Feb 2004
Updated by: Blogger Team
----------------------------------------------- */


It Should Look like this


-----------------------------------------------
Blogger Template Style
Name: Rounders
Designer: Douglas Bowman
URL: http://www.stopdesign.com/
Date: 27 Feb 2004
Updated by: Blogger Team
----------------------------------------------- */
#navbar-iframe {
display: none !important;
}

Add HTML and java Scripts Inside Blogger posts in a Display Box

It is very difficult for anyone using Blogger blogs to show HTML codes and JavaScript inside the blog posts . You might have also seen people showing the scripts in small display boxes of fixed length and width. Now after applying this Blogger trick , you would be able to show HTML and JavaScript inside Blogger posts with custom display boxes .


Click on layout of the blog in which want show HTML or JavaScript and now select edit HTML .Before you apply any Blogger hack ,remember to download and save your full template.Now tick the expand widget templates and move onto the selection shown below ( towards the end of CSS code )


Otherwise you can press Cntrl+F and paste ]]></b:skin> on appearing search box then enterPaste the following CSS code above that line .


pre
{
background:#efefef;
border:1px solid #A6B0BF;
font-size:120%;
line-height:100%;
overflow:auto;
padding:10px;
color:#000000 }
pre:hover {
border:1px solid #efefef;
}
code {
font-size:120%;
text-align:left;
margin:0;padding:0;
color: #000000;}
.clear { clear:both;
overflow:hidden;
}


The above code is for drawing a display box inside the Blogger post to show HTML and JavaScript.You can change the length ,width ,size and color of the box , back ground image etc. by editing the CSS code. After adding this code you can call the display box anytime into your post by following next step

<pre>

"your HTML or JAVA script"

</pre>

In Blogger in draft , there would be a problem with this HTML and JavaScript display box . For fixing that,Expand Post options from the Blogger text editor ( On the bottom left corner ) . From the compose settings, select Interpret typed HTML . Now everything would appear fine

Before you add "your HTML or JAVA script " make it post friendly by following this linkInside the box provided paste the script and click make it friendlyNow copy the generated code and paste between

<pre> & </pre>
to keep it inside display box

Making the script postable is the only requirement if you plan to show the HTML or Java Script alone , without a display box.


Please leave a comment if you like this post or subscribe to this blog via RSS or Email.

Add Digg button to Blogger

This is the step by step guide to show you how to add a Digg button to your Blog....
Digg is a social content website where your readers or you can submit content to. If you have a good story, members will 'digg' the post and write comments. As a blog owner, you may want to make it easy for and encourage your readers to submit and digg your articles.

Automatic Count and Vote Button

Before you do that though, you would want to take note of the following:-

1. Your blog should be set to save Post Pages. Post Pages are archived blog posts published to their own web page. Each post will have a unique URL, which is required by Digg for the individual posts to be submitted. To verify or enable it, login to your Blogger Dashboard. Under Settings-> Archiving, set the “Enable Post Pages?” to “Yes” and save the settings.

2. This template hack will put a Digg button to every post. You are therefore not able to choose which post you want to include or exclude a button. If you would prefer to have a Digg button added only to some posts, read the later part of this article on “Button for selective posts.”

3. The code reads the URL of the individual blog page and this shall be the URL used for submission of the story to Digg.

Under “Template”, click the “Edit HTML” tab. Block copy the entire HTML code for your site and save it in a text file. You can also click the "Download Template" link. This is one of the two necessary steps whenever you want to change the template. The second step is of course to “Preview” the new changes, and save the changes only when you are satisfied. The backup you have saved in a text file will come in handy when you accidentally click to save the changes without previewing them. With a backup, you can easily restore the template to the prior state if need be.

Click the box next to “Expand Widget Templates”. Scroll about two-thirds down the template to look for the code that reads:-

<p><data:post.body/></p>


If you want the button to show at the top right corner of your post, replace the above code with this.

<div style='float:right; margin-left:10px;'><script type='text/javascript'>digg_url="<data:post.url/>";</script><script src='http://digg.com/tools/diggthis.js' type='text/javascript'/></div><p><data:post.body/></p>


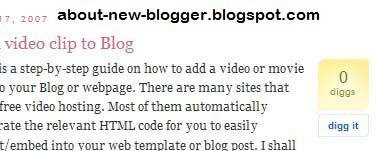
This is what you get:-


Please leave a comment if you like this post or subscribe to this blog via RSS or Email.

Add HTML, CSS, or Any script in Blogger Posts

I thought to post about Adding Scripts to Blogger posts as i think many of the people are facing problem, when they add a Html script to their post then that post after publishing comes to its layout........... to stop blogger from doing that you should do a simple and an easy step with your html.
Add < instead of < and > instead of >
For example
you i wanna add this html to blogger post

<p align="left"><form id="searchthis" action="YOUR BLOG URL/search" style="display:inline;" method="get">

I would change those starting and ending tags
like this:
p align="left" > form id="searchthis" action="YOUR BLOG URL/search" style="display:inline;" method="get"

Please leave a comment if you like this post or subscribe to this blog via RSS or Email.

Adding Blogger Search Box

Hi Friends...
This post is about adding a Blogger blog search box to your blog. Although Google Blogger have a Nav Bar at the top of blogs.... But if you want to add another search Box ( blogger search box) to the area of your then let me show you

Go to your Blogger account->Under Template->Page Elements tab, click “Add a Page Element” at the place where you want your search box to appear. Select “HTML/JavaScript”.There are several HTML codes posted on the net. I tried a few, and found the one that works as follows:-


<p align="left"><form id="searchthis" action="YOUR BLOG URL/search" style="display:inline;" method="get"><strong>NAME OF YOUR BLOG<br/></strong><input id="b-query" maxlength="255" name="q" size="20" type="text"/><input id="b-searchbtn" value="Search" type="submit"/></form></p>

Remember to change YOUR BLOG URL to the URL or web address of your Blog. Also, change the NAME OF YOUR BLOG to that which you want to call your site. For instance, if your Blog Name is long, you may want to write something like “Search Here” or “Search this site”.You can also change the “Search” button to say, “Hit” or “Go”, by changing the Value.Save the code and refresh your page. If you want a longer or shorter search box, you can play around with the size. The above example of a width size="20" and value="Hit" will give you this:-


Search Here


Whereas a width size="30" and value="Go" will give you this:-


search here

The size of the search box is a matter of appearance. You may have noticed that the maxlength="255". This indicates that a user may enter up to 255 characters in the search box, which I think is sufficient and need not be altered.


Please leave a comment if you like this post or subscribe to this blog via RSS or Email.