Blogger is making some great changes! Here are some details on the official Blogger blog. They always have been my favorite blogging platform and now there are going to be some helpful changes.
Blogger Buzz: What’s New With Blogger
Showing posts with label Blogger Tips. Show all posts
Showing posts with label Blogger Tips. Show all posts
Ad Networks
AdBrite: Currently AdBrite provides publishers with the Text Ads, Banner Ads, Full Page Ads, Inline Ads, InVideo, BritePic, and Facebook Apps.
Adsense: Google Adsense is the most well known ad network. They currently have the widest range of keywords for there ad network and some of the highest payouts. Adsense is very easy for publishers of all size to get accepted into their program. It is very important to read their policies before placing ads on your site or blog.
Remember do not click on your own ads!!!
Bidvertiser: Bidvertiser currently offers publishers the choice of displaying banners, skyscrapers, rectangles, buttons, and also free design. Along, with your typical ads that most are use to seeing Bidvertiser also offers publishers the ability to set up an RSS/ATOM feed, which will display Bidvertiser ads along with your RSS/ATOM feeds. RSS feeds are becoming more and more popular. This feature is very easy to setup, however it is important to remember that you will need to redirect your current RSS feed links on your blog to those that Bidvertiser gives you.
Sell your ad space with BidVertiser
Clickbooth : Clickbooth is a division of IntegraClick they currently offer publishers weekly payouts for both ads and also referral payouts. Clickbooth claim to offer the highest CPM’s & ECPM’s.
Clicksor : Clicksor currently only accepts sites that have either atleast 5,000 page views per day or 150,000 page views per month. Clicksor does not accept sites that are hosted free. Clicksor offers publisher the following formats;
* Inline Text Links “$0.15/click”
* Text Banner Ads “$0.10/click”
* Graphical/Rich Media Banners “$0.50/CPM”
* Graphical Banners ‘$0.10/click”
* Pop-Unders “$0.004/per visitor”
Now I know what your thinking $0.004/per visitor, but if you have 150,000 visitors per month that $600.
Text Link Ads : Text-link-ads works a little bit different than other ad networks. Instead of payouts being based on say a CPC like adsense. Text-link-ads prices are based on a “pricing algorithm that factors in: the traffic of your website, theme of your website, and link popularity of your website”. So therefore the more traffic that you coming to your site and how popular the site is “pagerank and alexa” determine what the payouts will be for the ads on your site. Publishers receive 50% of the final price of the ads that are sold to be placed on your site. Minimum payout for Text-Link-Ads is $25 dollars. Text-Link-Ads currently have over 20,000+ publishers. They also pay $25 for every referral that you send their way.
RevenuePilot : RevenuePilot pays publisher’s 60% of the bid price for the ads of their sites. They currently provide publisher with a lot of different types of ads such as: referrals, JavaScript “like adsense”, XML Feeds, Text Feed, HTML Feel “similar to adsense but doesn’t look as nice”, Dynamic Popouts, Popouts, Dynamic Layer Ads, Floating Ads, Interstitials, Banners, Searchbox, Verticals, and textlinks. RevenuePilots referral program works different from other publishers. Instead of pay say $10 dollars for referring someone to their program they pay you 10% of the revenue that the person you referred to them earns for life. Not a bad deal if the people you refer to them do well. RevenuePilot is very easy to get accepted into and they have a very quick and easy application process.
RocketProfit : RocketProfit is a new affiliate network available to publishers. RocketProfit is offers publishers the opportunity to earn revenue through referrals for a wide range of products. RocketProfit currently is offering publishers the use of banner ads, text link ads and campaign emails. With RocketProfit offers publishers some of the highest payouts available currently. Example: “Russ Dalbey’s Winning in the Cash Flow Business - Pays $110”. RocketProfit is definitely something for publishers to take a look at and see if it works for your site.
ValueClick : ValueClick is mainly looking for publishers with mainly US traffic. ValueClick pays publishers on a CPM basis. For most publishers the first couple days with ValueClick are great and then slowly their payouts drop off. Having never used ValueClick I can’t say for myself. On a positive note publishers are able to display ValueClick Banners on the same pages as their adsense ads, but you must disable the CPC for ValueClick.
Yahoo Publishing Network : Yahoo Publishing Network is relatively new it started back in 2005 and publisher could only be accepted by personal invite only. Well they have since opened it up to more publishers and is the top alternative for most publishers. Especially those that have been banned from adsense. There has been a lot of mixed feelings about Yahoo Publishing Network and the fact that it is still a beta after almost 3 years. A lot of publishers have been turned away from YPN due to low payouts. However, over time I think that YPN will come to be a top ad network for most publishers. Yahoo is continuing to acquire more and more advertisers, which means that the keywords that their ads support will continue to grow. Yahoo ads are a lot like those you get with adsense. Basically same format and same sizes. They also provide ads in RSS format.
Adsense: Google Adsense is the most well known ad network. They currently have the widest range of keywords for there ad network and some of the highest payouts. Adsense is very easy for publishers of all size to get accepted into their program. It is very important to read their policies before placing ads on your site or blog.
Remember do not click on your own ads!!!
Bidvertiser: Bidvertiser currently offers publishers the choice of displaying banners, skyscrapers, rectangles, buttons, and also free design. Along, with your typical ads that most are use to seeing Bidvertiser also offers publishers the ability to set up an RSS/ATOM feed, which will display Bidvertiser ads along with your RSS/ATOM feeds. RSS feeds are becoming more and more popular. This feature is very easy to setup, however it is important to remember that you will need to redirect your current RSS feed links on your blog to those that Bidvertiser gives you.
Sell your ad space with BidVertiser
Clickbooth : Clickbooth is a division of IntegraClick they currently offer publishers weekly payouts for both ads and also referral payouts. Clickbooth claim to offer the highest CPM’s & ECPM’s.
Clicksor : Clicksor currently only accepts sites that have either atleast 5,000 page views per day or 150,000 page views per month. Clicksor does not accept sites that are hosted free. Clicksor offers publisher the following formats;
* Inline Text Links “$0.15/click”
* Text Banner Ads “$0.10/click”
* Graphical/Rich Media Banners “$0.50/CPM”
* Graphical Banners ‘$0.10/click”
* Pop-Unders “$0.004/per visitor”
Now I know what your thinking $0.004/per visitor, but if you have 150,000 visitors per month that $600.
Text Link Ads : Text-link-ads works a little bit different than other ad networks. Instead of payouts being based on say a CPC like adsense. Text-link-ads prices are based on a “pricing algorithm that factors in: the traffic of your website, theme of your website, and link popularity of your website”. So therefore the more traffic that you coming to your site and how popular the site is “pagerank and alexa” determine what the payouts will be for the ads on your site. Publishers receive 50% of the final price of the ads that are sold to be placed on your site. Minimum payout for Text-Link-Ads is $25 dollars. Text-Link-Ads currently have over 20,000+ publishers. They also pay $25 for every referral that you send their way.
RevenuePilot : RevenuePilot pays publisher’s 60% of the bid price for the ads of their sites. They currently provide publisher with a lot of different types of ads such as: referrals, JavaScript “like adsense”, XML Feeds, Text Feed, HTML Feel “similar to adsense but doesn’t look as nice”, Dynamic Popouts, Popouts, Dynamic Layer Ads, Floating Ads, Interstitials, Banners, Searchbox, Verticals, and textlinks. RevenuePilots referral program works different from other publishers. Instead of pay say $10 dollars for referring someone to their program they pay you 10% of the revenue that the person you referred to them earns for life. Not a bad deal if the people you refer to them do well. RevenuePilot is very easy to get accepted into and they have a very quick and easy application process.
RocketProfit : RocketProfit is a new affiliate network available to publishers. RocketProfit is offers publishers the opportunity to earn revenue through referrals for a wide range of products. RocketProfit currently is offering publishers the use of banner ads, text link ads and campaign emails. With RocketProfit offers publishers some of the highest payouts available currently. Example: “Russ Dalbey’s Winning in the Cash Flow Business - Pays $110”. RocketProfit is definitely something for publishers to take a look at and see if it works for your site.
ValueClick : ValueClick is mainly looking for publishers with mainly US traffic. ValueClick pays publishers on a CPM basis. For most publishers the first couple days with ValueClick are great and then slowly their payouts drop off. Having never used ValueClick I can’t say for myself. On a positive note publishers are able to display ValueClick Banners on the same pages as their adsense ads, but you must disable the CPC for ValueClick.
Yahoo Publishing Network : Yahoo Publishing Network is relatively new it started back in 2005 and publisher could only be accepted by personal invite only. Well they have since opened it up to more publishers and is the top alternative for most publishers. Especially those that have been banned from adsense. There has been a lot of mixed feelings about Yahoo Publishing Network and the fact that it is still a beta after almost 3 years. A lot of publishers have been turned away from YPN due to low payouts. However, over time I think that YPN will come to be a top ad network for most publishers. Yahoo is continuing to acquire more and more advertisers, which means that the keywords that their ads support will continue to grow. Yahoo ads are a lot like those you get with adsense. Basically same format and same sizes. They also provide ads in RSS format.
Adding a Banner to Minima Template
In my previous post I showed you how to add a banner to the Thisaway blogger template. Now lets look at how to add a banner to the Minima Blogger template. To add a banner to the Minima template is much easier to do than the Thisaway template because it doesn’t require that you add anything to the CSS. The ideal location for a banner on the Minima template is directly beneath the header. To add a banner directly under the header simply
Step 1 : login to your blogger account and click on the layout tab. Then select edit HTML
Step 2 : Scroll down to the end of your HTML code and locate the script <div id=’content-wrapper’>.
Step 3 : paste your banner code directly under <div id=’content-wrapper’>.
Step 4 : Click save template and your done.
You will notice in my example that I have provided that I place the banner code inside <center></center>. List will align the banner in the center of the page, and give you the ideal placement of your banner.
Good Luck
Step 1 : login to your blogger account and click on the layout tab. Then select edit HTML
Step 2 : Scroll down to the end of your HTML code and locate the script <div id=’content-wrapper’>.
Step 3 : paste your banner code directly under <div id=’content-wrapper’>.
Step 4 : Click save template and your done.
You will notice in my example that I have provided that I place the banner code inside <center></center>. List will align the banner in the center of the page, and give you the ideal placement of your banner.
Good Luck
Adding a Banner to your Blogger
In this demonstration I am going to show you very easily how to add a 468 x 60 to the header of your blogger account. For this demonstration I will be using the theme Thisaway. To add a 468 x 60 banner to your blogger requires that we place three pieces of code inside your Blogger template.
Step 1: Once you have logged into your blogger account go to the layout tab and select edit html.
Step 2: The first piece of could that we need to enter into our template is a
Step 1: Once you have logged into your blogger account go to the layout tab and select edit html.
Step 2: The first piece of could that we need to enter into our template is a
inside our CSS. Now if you’re not familiar with programming don’t worry about it, just simple copy the code below.
#banner_468_60 {
float: right;
width: 468px;
height: 60px;
position: relative;
text-align: center;
padding-top: 2px;
padding-bottom: 2px;
padding-left: 2px;
padding-right: 2px;
}
Now you can place this piece of code anywhere within the CSS for the layout.
Step 3: Once we have defined the CSS for our banner now were are ready to place the
#banner_468_60 {
float: right;
width: 468px;
height: 60px;
position: relative;
text-align: center;
padding-top: 2px;
padding-bottom: 2px;
padding-left: 2px;
padding-right: 2px;
}
Now you can place this piece of code anywhere within the CSS for the layout.
Step 3: Once we have defined the CSS for our banner now were are ready to place the
inside our template. Now you are going to want to place the
code wherever you are going to want your banners to show up at. For this demonstration we are going to place it inside the header. Simply copy the code before and place into your Blogger template. Since we are wanting our banner to show up in the header we must placed our code right below
, which you will find inside your template.
If you have done everything right you should be able to view your blogger and see you banner ad displayed in your banner.
Now to adjust the alignment of your banner simply go back to where you enter the CSS for the Banner and change the padding until you find the alignment that you like.
Note this particular code only works with the Thisaway template. Over the next week or so I will place the steps to adding a banner to other blogger templates so check back.
If you have done everything right you should be able to view your blogger and see you banner ad displayed in your banner.
Now to adjust the alignment of your banner simply go back to where you enter the CSS for the Banner and change the padding until you find the alignment that you like.
Note this particular code only works with the Thisaway template. Over the next week or so I will place the steps to adding a banner to other blogger templates so check back.
How to Create Read More
If you post an articel to your blog it will displayed on a main page, if you have a long post content, your blog will opened more long time. But it can be tricked with a script to short your post or only abstraction post will dispaled on a main page, and the full post will replaced by "Read More" link. Here's the trick to create "Readmore"
1. You have to Login to blogger, then chose Layouts --> Edit HTML
2. Click on "Expand Widgets Template" checkbox.
3. Find the code below in your HTML Codes. ( the short way to find is by copy the code below then press "Ctrl + F" then paste in the box)
or
4. If you have found it, put the code below under the above code.
5. Under the code, you will find code like this <p><data:post.body/></p> you have to put the code below under it.
7. Save your job.
8. Go to Setting --> Formatting Tab menu
9. At the lower page you will found "text area" box beside text "Post Template"
10. Put the code below to the box
11. Then click Save the setting.
12. If you want to post, put your short post or description above this code <span class="fullpost">, and the next or full post put between <span class="fullpost"> and </span> code.
GOOD LUCK!!!!!
1. You have to Login to blogger, then chose Layouts --> Edit HTML
2. Click on "Expand Widgets Template" checkbox.
3. Find the code below in your HTML Codes. ( the short way to find is by copy the code below then press "Ctrl + F" then paste in the box)
<div class="post-header-line-1">
<div class="post-body">
</div>
</div>
or
<div class='post-header-line-1'/>
<div class='post-body entry-content'>
4. If you have found it, put the code below under the above code.
<b:if cond='data:blog.pageType == "item"'>
<style>.fullpost{display:inline;}</style>
<p><data:post.body/></p>
<b:else/>
<style>.fullpost{display:none;}</style>
5. Under the code, you will find code like this <p><data:post.body/></p> you have to put the code below under it.
<a expr:href='data:post.url'>Read More......</a>
</b:if>
6. You can change the "Read More" text with other.
7. Save your job.
8. Go to Setting --> Formatting Tab menu
9. At the lower page you will found "text area" box beside text "Post Template"
10. Put the code below to the box
<span class="fullpost">
11. Then click Save the setting.
12. If you want to post, put your short post or description above this code <span class="fullpost">, and the next or full post put between <span class="fullpost"> and </span> code.
GOOD LUCK!!!!!
Tips to Start Blogging Successfully

Let’s discover the 9 tips you can apply in your blog:-
1. Have a Consistent URL
2. Choice of subject to blog about
3. High Quality Content can get hard to produce consistently
4. Marketing your blog is hard work
5. Technical know how is required
6. Research, Read, Reflect
7. Expect to ride an emotional roller coaster
8. Be prepared to sacrifice something in life
9. Writing a good post takes time and patience
2. Choice of subject to blog about
3. High Quality Content can get hard to produce consistently
4. Marketing your blog is hard work
5. Technical know how is required
6. Research, Read, Reflect
7. Expect to ride an emotional roller coaster
8. Be prepared to sacrifice something in life
9. Writing a good post takes time and patience
Adsense ads in Blogger post body
Using Blogger Feature:
You can use Blogger's own feature of putting ads in between posts...
Go to Layout -> Page Elements... you would see "Blog posts" click the edit link at the bottom right corner.
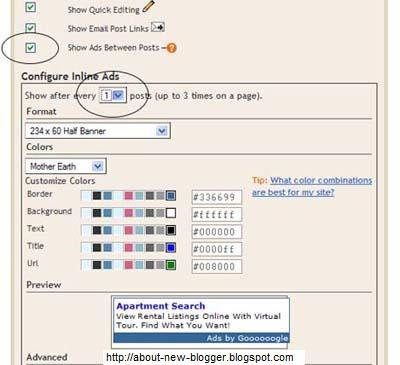
You would need a Google Adsense . You will be assigned a publisher identity number which shall appear in all your adsense codes.....
Tick the "Show Ads Between Posts" .You can select whether to show ads after every post or after several posts.
Save and refresh your blog to see the ads...
More ad Locations:
Login to Google Adsense Account
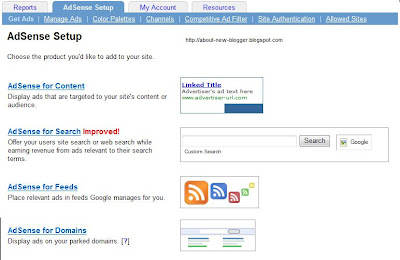
Go to Adsense For Content
Make Ad of your choice
You would get a Adsense Code
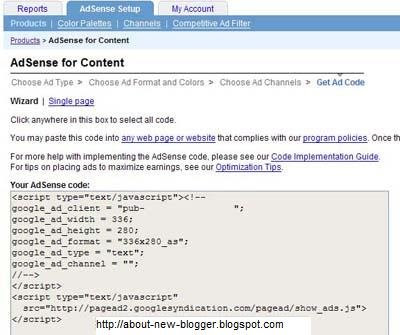
Changing the Adsense Code:
You Should replace some character
> with >
" with "
<script type="text/javascript"><!--
google_ad_client = "pub-0000000000000000";
google_ad_width = 336;
google_ad_height = 280;
google_ad_format = "336x280_as&amp;quot;;
google_ad_type = "text";
google_ad_channel = "";
google_color_border = "FFFFFF";
google_color_bg = "FFFFFF";
google_color_link = "000000";
google_color_text = "000000";
google_color_url = "000000";
//--></script>
<script type="text/javascript"
src="http://pagead2.googlesyndication.com/pagead/show_ads.js">
</script>
Insert Code Into Template:
Go to Blogger Account and Layout -> Edit HTML
"Expand Widget Templates"
First Download your template before making any changes...
Now search for "post.body" you should see these lines
<div class='post-body'>
<p><data:post.body/></p>
<div style='clear: both;'/> <!-- clear for photos floats -->
</div>
If you want the ads to appear between your post title and post body, add the following code above the orange lines and if you want you your adsense code immediately after every individual post, add the following post below the orange lines.
The code to add is
<div style='float:left; margin-left:30px'>Keep blogging!!!
AdSense Code
</div>
if you like this post then please leave a comment or subscribe via RSS or Email.
To Hide The Blogger Nav Bar
1- Log in to blogger
2- On your Dashboard, select Layout. This will take you to the Template tab. Click Edit HTML. Under the Edit Template section you will see you blog's HTML.
3- paste this CSS definition
Just Below this
It Should Look like this
2- On your Dashboard, select Layout. This will take you to the Template tab. Click Edit HTML. Under the Edit Template section you will see you blog's HTML.
3- paste this CSS definition
#navbar-iframe {
display: none !important;
}
Just Below this
-----------------------------------------------
Blogger Template Style
Name: Rounders
Designer: Douglas Bowman
URL: http://www.stopdesign.com/
Date: 27 Feb 2004
Updated by: Blogger Team
----------------------------------------------- */
It Should Look like this
-----------------------------------------------
Blogger Template Style
Name: Rounders
Designer: Douglas Bowman
URL: http://www.stopdesign.com/
Date: 27 Feb 2004
Updated by: Blogger Team
----------------------------------------------- */
#navbar-iframe {
display: none !important;
}
Add Digg button to Blogger
This is the step by step guide to show you how to add a Digg button to your Blog....
Digg is a social content website where your readers or you can submit content to. If you have a good story, members will 'digg' the post and write comments. As a blog owner, you may want to make it easy for and encourage your readers to submit and digg your articles.
Automatic Count and Vote Button
Before you do that though, you would want to take note of the following:-
1. Your blog should be set to save Post Pages. Post Pages are archived blog posts published to their own web page. Each post will have a unique URL, which is required by Digg for the individual posts to be submitted. To verify or enable it, login to your Blogger Dashboard. Under Settings-> Archiving, set the “Enable Post Pages?” to “Yes” and save the settings.
2. This template hack will put a Digg button to every post. You are therefore not able to choose which post you want to include or exclude a button. If you would prefer to have a Digg button added only to some posts, read the later part of this article on “Button for selective posts.”
3. The code reads the URL of the individual blog page and this shall be the URL used for submission of the story to Digg.
Under “Template”, click the “Edit HTML” tab. Block copy the entire HTML code for your site and save it in a text file. You can also click the "Download Template" link. This is one of the two necessary steps whenever you want to change the template. The second step is of course to “Preview” the new changes, and save the changes only when you are satisfied. The backup you have saved in a text file will come in handy when you accidentally click to save the changes without previewing them. With a backup, you can easily restore the template to the prior state if need be.
Click the box next to “Expand Widget Templates”. Scroll about two-thirds down the template to look for the code that reads:-
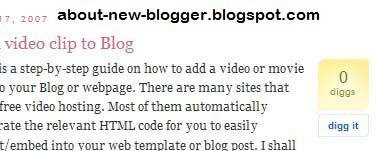
If you want the button to show at the top right corner of your post, replace the above code with this.
This is what you get:-
Please leave a comment if you like this post or subscribe to this blog via RSS or Email.
Digg is a social content website where your readers or you can submit content to. If you have a good story, members will 'digg' the post and write comments. As a blog owner, you may want to make it easy for and encourage your readers to submit and digg your articles.
Automatic Count and Vote Button
Before you do that though, you would want to take note of the following:-
1. Your blog should be set to save Post Pages. Post Pages are archived blog posts published to their own web page. Each post will have a unique URL, which is required by Digg for the individual posts to be submitted. To verify or enable it, login to your Blogger Dashboard. Under Settings-> Archiving, set the “Enable Post Pages?” to “Yes” and save the settings.
2. This template hack will put a Digg button to every post. You are therefore not able to choose which post you want to include or exclude a button. If you would prefer to have a Digg button added only to some posts, read the later part of this article on “Button for selective posts.”
3. The code reads the URL of the individual blog page and this shall be the URL used for submission of the story to Digg.
Under “Template”, click the “Edit HTML” tab. Block copy the entire HTML code for your site and save it in a text file. You can also click the "Download Template" link. This is one of the two necessary steps whenever you want to change the template. The second step is of course to “Preview” the new changes, and save the changes only when you are satisfied. The backup you have saved in a text file will come in handy when you accidentally click to save the changes without previewing them. With a backup, you can easily restore the template to the prior state if need be.
Click the box next to “Expand Widget Templates”. Scroll about two-thirds down the template to look for the code that reads:-
<p><data:post.body/></p>
If you want the button to show at the top right corner of your post, replace the above code with this.
<div style='float:right; margin-left:10px;'><script type='text/javascript'>digg_url="<data:post.url/>";</script><script src='http://digg.com/tools/diggthis.js' type='text/javascript'/></div><p><data:post.body/></p>
This is what you get:-
Please leave a comment if you like this post or subscribe to this blog via RSS or Email.
Add HTML, CSS, or Any script in Blogger Posts
I thought to post about Adding Scripts to Blogger posts as i think many of the people are facing problem, when they add a Html script to their post then that post after publishing comes to its layout........... to stop blogger from doing that you should do a simple and an easy step with your html.
Add < instead of < and > instead of >
For example
you i wanna add this html to blogger post
<p align="left"><form id="searchthis" action="YOUR BLOG URL/search" style="display:inline;" method="get">
I would change those starting and ending tags
like this:
 p align="left" >
  form id="searchthis" action="YOUR BLOG URL/search" style="display:inline;" method="get"
Please leave a comment if you like this post or subscribe to this blog via RSS or Email.

Adding Blogger Search Box
Hi Friends...
This post is about adding a Blogger blog search box to your blog. Although Google Blogger have a Nav Bar at the top of blogs.... But if you want to add another search Box ( blogger search box) to the area of your then let me show you
Go to your Blogger account->Under Template->Page Elements tab, click “Add a Page Element” at the place where you want your search box to appear. Select “HTML/JavaScript”.There are several HTML codes posted on the net. I tried a few, and found the one that works as follows:-
<p align="left"><form id="searchthis" action="YOUR BLOG URL/search" style="display:inline;" method="get"><strong>NAME OF YOUR BLOG<br/></strong><input id="b-query" maxlength="255" name="q" size="20" type="text"/><input id="b-searchbtn" value="Search" type="submit"/></form></p>
Remember to change YOUR BLOG URL to the URL or web address of your Blog. Also, change the NAME OF YOUR BLOG to that which you want to call your site. For instance, if your Blog Name is long, you may want to write something like “Search Here” or “Search this site”.You can also change the “Search” button to say, “Hit” or “Go”, by changing the Value.Save the code and refresh your page. If you want a longer or shorter search box, you can play around with the size. The above example of a width size="20" and value="Hit" will give you this:-
Whereas a width size="30" and value="Go" will give you this:-
This post is about adding a Blogger blog search box to your blog. Although Google Blogger have a Nav Bar at the top of blogs.... But if you want to add another search Box ( blogger search box) to the area of your then let me show you
Go to your Blogger account->Under Template->Page Elements tab, click “Add a Page Element” at the place where you want your search box to appear. Select “HTML/JavaScript”.There are several HTML codes posted on the net. I tried a few, and found the one that works as follows:-
<p align="left"><form id="searchthis" action="YOUR BLOG URL/search" style="display:inline;" method="get"><strong>NAME OF YOUR BLOG<br/></strong><input id="b-query" maxlength="255" name="q" size="20" type="text"/><input id="b-searchbtn" value="Search" type="submit"/></form></p>
Remember to change YOUR BLOG URL to the URL or web address of your Blog. Also, change the NAME OF YOUR BLOG to that which you want to call your site. For instance, if your Blog Name is long, you may want to write something like “Search Here” or “Search this site”.You can also change the “Search” button to say, “Hit” or “Go”, by changing the Value.Save the code and refresh your page. If you want a longer or shorter search box, you can play around with the size. The above example of a width size="20" and value="Hit" will give you this:-
Whereas a width size="30" and value="Go" will give you this:-
Please leave a comment if you like this post or subscribe to this blog via RSS or Email.
Subscribe to:
Posts (Atom)